My pal Jim from BBTI pointed out an article in American Handgunner about ‘Hard Times Hollowpoints‘ in which they discussed drilling jacketed bullets to make your own hollow point bullets. The recommended using a center-drill for this, which makes sense.

You may have noticed that a lot of modern hollow-points have a conical opening with a cylindrical hole at the bottom? A center drill just happens to be that shape… The article advocated setting this up in the tailstock of a lathe and inserting a straight-walled cartridge in the lathe to drill the cavity. Thinking it through carefully I could not come up with a single reason not to put a live cartridge in the lathe to do this. Nevertheless I did not; I used just the bullets. For this I selected a Berry’s 230GR. TMC RN.
I didn’t see it mentioned in the original article, but bullet selection for this is crucial. Most full-metal case ammunition has a cup-shaped copper jacket swaged over the lead core with the bottom of the bullet being exposed lead. This type of ammunition is unsuitable for conversion to hollow-points as removing the jacket from the front of the bullet means you now have a copper tube filled with much softer lead. Subject this to the high pressure of firing and there’s a very good chance the lead will be blown out of the center, leaving the jacket somewhere in the barrel. The results of this can be anywhere from seriously annoying to catastrophic and even dangerous. To avoid this use either cast lead, semi-jacketed or total metal jacket bullets.

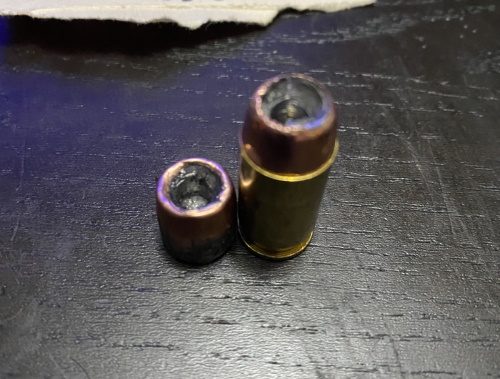
I put the bullet loosely in the chuck and moved the point of the bit until it hit zero (pushing the bullet in slightly) before tightening the chuck on the bullet. Then I turned the lathe on and advanced the bit 3/8″. This resulted in a bullet with a gaping hollow-point and a weight of 192gr. This proved to be pretty repeatable, with bullets ranging from 192.9 to 192.7 gr. Close enough for testing.


Loading the rounds reduced the diameter of the opening of the hollow-point, but this was expected and not really unwelcome; the slightly rounded rim of the cavity will help with feeding and it’s still a mighty big hole.
When I had a few made I loaded them based on Alliant’s manual for a 200gr. JHP. This was 7.1gr of Unique. This is supposed to drive a 200gr JHP at 975 fps. from a 5″ barrel. Good enough.

I’d planned to cast a fresh block or two of Clear ballistics ordinance gel and gathered the pieces to melt. Then I thought, ‘screw it’ and fit them together to form one mostly continuous, uh, thing. It’s cool too see the actual wound-track and can be instructive, but I was really most interested in penetration and expansion, and that could be measured well enough with my sketchy pieced-together block. I placed the four layers of denim over the end of the block, set up the chronograph and had at it.
The shots averaged 976 fps. for 406 ft/lbs. with an extreme spread of 9 fps. Penetration of the first two shots through the denim and gel was 15″. Contrary to my expectations neither bullet expanded. I mean, those were some pretty big, gaping hollow-points. OK, it is what it is. A third shot without the denim showed very modest expansion.

It’s funny, I’d expected them to expand. In fact I was worried about them underpenetrating and/or shedding their jackets. None of that! I’m thinking the lead in these might be too hard. I know that at this velocity the Speer 200gr. JHP has adequate penetration and expands very well in this kind of test.
OK, let’s crank it up a notch. I made some 175grs. with and even bigger hollow-point and loaded them over 7.1gr. of Unique. Velocity? Don’t know… the battery in the chrono died. Probably safe to guess it’s between 975-1000 fps. The result?

Basically the point expanded to bullet-diameter. Penetration through denim and gel was 17″. There was a huge wad of denim in the hollow-point. This is not working at all. Based on the qualities of the shavings produced in cutting the cavity the lead in these is very hard, which may be why the results have been what they are.
Regardless it has been interesting and the method of producing the cavity in the nose has proved out. Perhaps I’ll try this with some softer cast lead bullets. I’m intrigued.
Stay safe and take care,
Michael Tinker Pearce, 4 January 2022
If you like what you see here and want to support this content please consider clicking the link above and supporting me on Patreon.
Run the lathe slower and you will get a better finish. Once you have drilled the nose of the bullet take a razor saw and cut 6 slots (2 at a time) 60 degrees apart and if your bullet expands it will form petals. You only need to cut the slots .020 deep, once moving the copper will tear open as much as is necessary. If the lead used in making the bullet is too hard you may be out of luck. Test in a Fackler water bag box and you will know if they work.
You are absolutely correct about blowing cores out of open bottom jackets.
Thanks Brett! Thank you! A number of readers on social media have pointed out that the jackets need to be scored, which was a major ‘duh’ moment for me. I’ll be testing your suggestion and some variations on that theme soon. Stay tuned!