Having just competed The Outlaw I was left with a cap-and-ball cylinder I had no use for and a metal lathe that was doing nothing particular at that moment. Hmmm… I wonder if I can bore this out to shoot the original .44 Colt?* I pulled the nipples, chucked up the cylinder and turned down the back around the ratchet so it would fit the gated ring that came with the Kirst Konverter. Well, that’s what I meant to do… It actually came out a bit small. No matter, I can always make a pass-through breech plate.
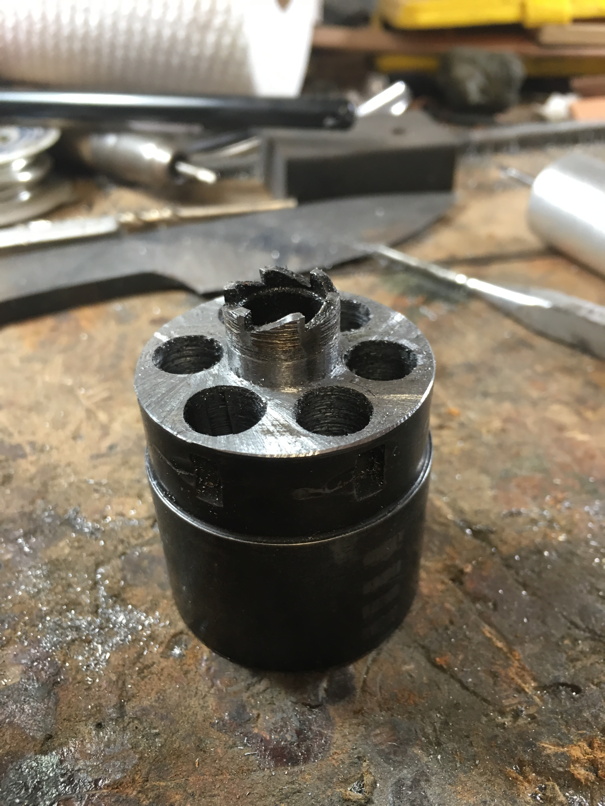
Rummaging around in Uncle Jim’s tool box I came up with a .450 drill bit. I set up the milling vice in the drill press, grabbed the cutting fluid and away I went. No real issues drilling out the soft steel cylinder- until I discovered it had broken through the base of the cylinder lock notch.
Oh dear… well, nothing ventured, nothing gained and it’s not like I was going to use it… Fast forward to this morning. We had electricians running power in for the milling machine (finally!) so I was very limited in what sort of work I could do. I finished the few odds and ends I could manage without interfering with the workers and had a smoke while I contemplated what to do next. My eye fell on the ruined cylinder and something occurred to me- while I couldn’t cut chambers for .44 Colt that wasn’t the only caliber in the world. As it happened there was 16″ of .357 barrel-liner lying on the bench that I had been wondering what to do with. A barrel liner that just happened to have a nominal outside diameter of .444″.
The drill press wouldn’t produce dust and since it is in the corner opposite where the electricians were working I could see no reason not to bore out another chamber or five. Thirty minutes and a half-cup of cutting fluid later all six chambers were bored through, and yep-every one of them broke through the locking notch. No matter. Off to the bandsaw (which was only a little bit in the way) to cut a two-inch section of barrel-liner. With the help of a handy hammer and an immoderate amount of pounding I was able to get the liner into one of the chambers.
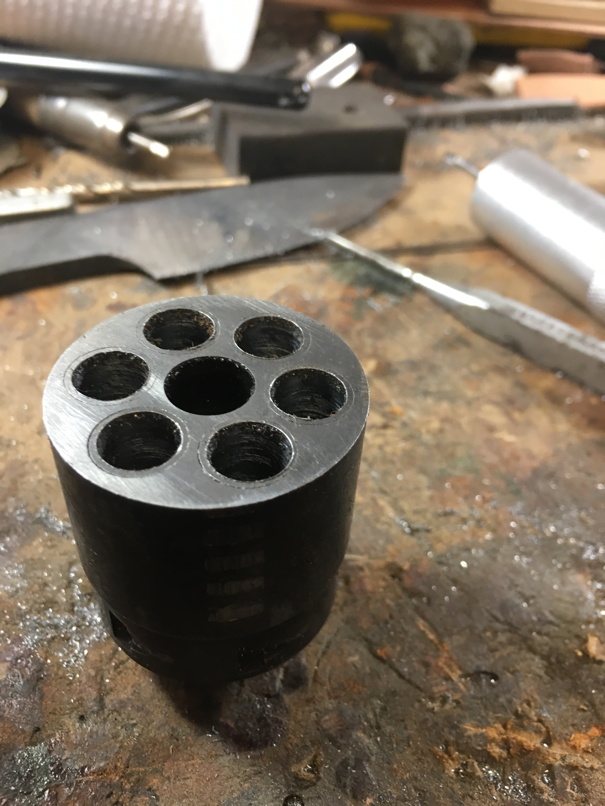
Success! I trimmed off the excess and repeated the process five more times. Now I had a cylinder with six lined chambers. Uh… rifled chambers. Yeah, that’s not right. Back to the drill-press. I bored all six chambers with a .355″ drill, dressed the front of the cylinder and with some judicious filing got the back fixed up. Sweat in some silver solder, dress the back of the cylinder and it’ll ready for the chamber reamer!
OK, some of those holes aren’t perfectly straight, which was some concern to me until I measure a couple of cylinders I have lying around and found they were pretty damn close to what the factory produced. Certainly they will line up with the forcing cone well enough, and I happen to have a buddy with a forcing-cone reamer who lives nearby.
Those of you acquainted with basic math will note that I still have 4″ of barrel liner left, so if I happen across a Pietta .44 or .36 yearning to be a short-barreled cartridge conversion I’m all set. Next I need to make the base-plate. This will have a simple pass-through rather than an actual gate. No point in pushing it… this time.
*Modern .44 Colt uses a .429 diameter bullet and will not work in a .44 cartridge conversion. Like the originals .44 C&B reproductions are actually .45 Caliber with a .451-.454 bore. The original .44 Colt used a .451 heeled bullet with the same outside diameter at the front as the cartridge case and a .430 heeled base. Sort of like a .22 on steroids.
I posted Phase 1 of this build several months ago, but I thought I’d save you the trouble of looking it up so I’ve included that post in this one.
The starting point for this conversion is a Pietta 1851 Navy Colt reproduction fitted with a .44-caliber cylinder and barrel. I’m not sure this is something that ever existed in history, but that’s OK. This gun is old and well-used. Most of the color-case hardening is worn away and there are nick and scratches indicative of long use. While there is fine pitting throughout the bore the rifling is strong, so I am not overly concerned on that point.
This is the gun in its original form- 7-1/2″ barrel, loading lever, full ‘plow-handle’ grip. I looked at a number of concepts ranging from a full-length ‘steampunk’ version of the gun to a very snub-nosed ‘Avenging Angel.’ Â What I settle on eventually was a reshaped handle and a relatively short but not ‘snub-nosed’ barrel. I settled on a length of 3-1/2″ because that’s the shortest practical length if I decide to add an ejector to the gun after it’s converted to fire metallic cartridges.
To go with the shorter barrel I wanted a more compact handle and the go-to shape for guns of this type is the ‘bird’s head.’ Frankly Ive done that a few times already, and was looking for something else. Thinking of N-Frame S&Ws fitted with K-frame grips it occurred to me- what if I grafted the grip of an 1849 onto the 1851 frame? Â OK, it won’t work- not to mention that I don’t have an 1849 grip frame lying around. But I could approximate the size of an 1849 grip-frame.
To start with I removed the one-piece walnut grip and the bottom retention screw, then squeezed gently to narrow the width of the grip until it approximated an 1849 grip. This left approximately 1/4″ of the back-strap protruding from the bottom front of the grip. I drilled a new screw hole, threaded the screw in and cut off the excess. I also ground a bit away at the bottom front of the handle to eliminate some of the ‘hook’ in the original grip. For esthetic reasons I rounded the bottom of the frame a bit as shown below-
So, now I had my grip-frame. Now for the grips… I cheated of course. I cut the single-piece stock grip into two pieces and ground them flat on the bottom to make two grips. I’ll tell the story with pictures and captions for a bit:
Here’s one of the new grip panels with the outline of the new frame. I carefully ground each side to fit the new profile, and rounded the outer surface to approximate the original.
I drilled the hole for the grip screw, counterbored them for the nut on the left side and the bushing for the screw on the right side, mounted the grips and shaped them precisely to the frame. Â I drilled through the bottom front of the frame for a 1/8″ brass pin, then bored each grip to fit over the pin. This prevents the grips from slipping out of place when the grips are screwed on. I then polished the grips and frame together to get the proper fit.
I’ve always found dealing with the wedge-retention screw a pain, so I flattened one side. Turn the screw 3/4 of a turn and the wedge can easily be removed.
Next I removed the loading lever and cut the barrel at just over 3-1/2 inches using a bimetal blade on my metal-cutting bandsaw. I squared this up on my Bader belt-grinder, then re crowned it with a conical burr. I also took the opportunity to remove the markings and italian proof-marks.
I could have simply reinserted the loading-lever screw, but this looked clunky to me and lacked intention, so it was back to the Bader for some judicious reshaping. The result was much more complete and purposeful looking:
At this point I detail-stripped the pistol; quite a bit of gunk around the innards, which I cleaned off and oiled the parts. The color-case hardening was worn and in bad shape, so I polished the frame and cylinder. Â The barrel, cylinder and frame were the immersed in Van’s Instant Blue for several minutes, then removed and thoroughly hosed down with WD40.
After a good soak I cleaned off the excess oil and thoroughly buffed them vigorously with paper towels. Time for a front-sight, and I planed a simple post like the pistol originally had.
I drilled a 1/8″ hole approximately 3/32″ deep in the tip of the barrel, and returning to the workbench I used a 1/16″ burr in the flex-shaft tool to undercut the edges of the hole so the bottom was wider than the top. I inserted a short section of 1/8″ brass rod and hammered it into place. The caused the base of the peg to expand into the undercut section of the hole, essentially forming a blind rivet. I then trimmed the post to my best guess at the correct height and buffed if to remove the corners. I ground a slight ‘swoop’ a few hundredths deep in the top of the barrel on a whim, leaving the front sight on a slightly raised ‘platform’ and re-blued it without polishing so that the top of the barrel is less reflective than the polished surfaces. Using a round needle-file I enlarged the rear-sight (the tip of the hammer, actually) to a good size to work with the post.
Time to reassemble the essentially finished gun. I find the ergonomics and balance quite delightful; the gun is eminently point-able and comfortable in my hand. It feels much lighter and handier than it did in its original form, though at 32oz. it’s still not exactly a light-weight. A good thing, that; .45 Colt isn’t exactly a powderpuff, even with loads limited to less than 1000 fps.
The above was posted back in April and it’s now August. Last Thursday the Gated Kirst Konverter arrived, and I immediately mounted it.
I had to shorten the forcing cone slightly, but that was the work of seconds. Once that was set it was time to address the loading-groove in the frame. On the Remington converter Kirst specified using a 5/8″ sanding drum on a Dremel tool, but I have a 5/8″ contact wheel for my Bader BIII belt grinder. Much quicker! Â I ground first with a 60-grit belt, then used a 400-grit to clean it up. I applied Van’s Instant Blue to the hot metal and it took very nicely-
After carefully de-burring where the cylinder’s pawl is exposed I fitted the new conversion. It works a treat except…
The converter ring can move very slightly sideways when the gate is open, and this causes the cylinder to bind if you aren’t careful. If you bear that in mind it’s still easy to make things work for loading and unloading, but it’s a little disappointing. I think I have a fix for it however, so it’s not a big deal.
The standard load for .45 Colt has an overall length of 1.6″, but this cylinder is shorter than a normal cylinder and they recommend loading to 1.58″ to allow the cylinder to rotate freely. Â I used my usual load, a 200gr. LRNFP over 9.0 gr. of Unique with a CCI300 primer, but I loaded them to an overall length of 1.45″. Yes, I could have used Schofield brass, but why when I have all of this .45 Colt brass lying around?
With the gun finished and ammo on-hand it was time to try it out with a quick trip to Champion Arms indoor range. Recoil is sharpish but it doesn’t beat you up. The shape of the modified grip-frame works a treat at managing the recoil. Here’s footage of me shooting at ten yards, followed by the target:
As you can see in the video muzzle-flip isn’t excessive, and accuracy is fine. The only issue is that after 75 rounds or so the loading-gate hinge-screw backed out enough to block the cylinder from turning. Easy fix- pop the wedge, remover the converter and tighten the screw, but I called it a day and headed home where I had better tools. Â Needs some Loctite, obviously.
I really enjoy shooting this gun and am quite happy with how it has come out. I originally contemplated fitting an ejector but generally the brass will fall free with a little coaxing, and using a cleaning rod to clear the empties is no problem. Speed reloads was never going to be a thing with this gun anyway…
So, is it finished? Well, yes and no. See, I now had this cap-and-ball cylinder that I don’t need, and I have a metal-lathe…
The line between the notches on the converter is owing to it’s larger diameter in this section.Â
I’ve removed the nipples and turned down the back of the cylinder to work with the Converter ring, and plan to bore-through the cylinders for .450 Adams (if there is enough room for the cartridge) or .44 Colt (Original, using heeled bullets) if there isn’t. Needless to say if this works I will be very cautious about working up loads for it…
I turned the back down a little too much, so likely I’ll make my own backplate with a loading slot but no gate. If it works I’ll have two converters for this gun- or a spare converter for another gun…
Linda and I made the weekly pilgrimage to Champion Arms but this week we had a purpose- for Linda to test-fire four guns and pick a favorite. She got to shoot the Chiappa Rhino, her Kahr E9, the Para-Ordinance LDA .45 and her newest, a Taurus PT738 .380 side-by-side. It was the first time out of the gate for the Taurus and she was eager to try it.
The Taurus is a very small, flat gun weighing only 12 ounces fully loaded. It’s 5-1/4 inches long by 3-5/8″ tall including the magazine base, which forms an integral part of the handle. The gun fires from a locked breech and has a six-round magazine.
A lot of small .380s can be rather snappy to shoot but the Taurus, while it has a lot of muzzle-flip, doesn’t beat you up. With factory ammunition it was 100% reliable in my hands, but Linda had some issues, which increased the longer she shot. The gun would occasionally either fail to strip the next round from the magazine or fail to fully come into battery. Since I didn’t have any similar problems I think she is having issues with grip sensitivity. She’s going to work on her hand strength, and I am pretty sure this and practice will solve the problem.
My first .380 ACP hand-loads did not fare so well; I erred on the side of caution on the powder charge and they were just a bit too wimpy to cycle reliably. Live and learn, I guess.
Linda had no trouble at all keeping her shots on the paper at seven yards, as you can see-
Next up was the Chiappa Rhino. Linda adores this gun and has a ball shooting it. She found it very pleasant to shoot with my wadcutter hand-loads. Factory Fiochi 125 FMCFPs were a little stout for her, but she is sure she will get used to it in time… in fact she’s eager to try it with some .357 Magnum loads!
Linda’s 7 yard double-action target
I did a bit of shooting with the Chiappa myself. When I originally tested this gun I found it shot quite low at seven yards, but I have since discovered that it was me. It’s a weird gun, and not just because the barrel is in the ‘wrong’ place. I’ve found that the faster I pull the trigger the more accurate it is! Like I said, weird- but very, very good. I bent the range rules rather a lot to shoot this seven-yard rapid-fire group at a rate of two shots per second-
I also tried a double-action group at twenty-five yards- not spectacular but not tragic for a 2″ barreled gun. I’ll keep practicing…
Linda also enjoyed shooting the LDA .45 and her Kahr, but then she always does. The Kahr remains her favorite- by a narrow margin- but the others? She can’t choose.
I also tried a new load for the S&W .32 Double Action snubby. Â This is more like it! The muzzle-blast cracks instead of phfarts and the holes in the target are much cleaner. There’s bit of authority to these rounds, but they are only slightly snappier than Remington factory loads. I like them a lot- these are going to be my new standard loads for this pistol. Seven yards, rapid-fire-
This is a fun little gun, but it’s not an easy gun to shoot until you get used to it. Oddly I tried the gun single action, and I can actually shoot it more accurately double action. I guess it’s just what I am used to.
The successful loads used this evening were:
.38 Special- 148gr. BBWC on top of 3.3gr. of Unique
.32 S&W- 96gr. LRN-FP on top of 2gr. of Red Dot
9x19mm- 125gr. LRN-FP on top of 4.3gr. of Red Dot
.45 ACP- 200gr. LRN-FP on top of 5.3gr. of Unique. Â This load was a very good soft-shooting target round that functioned perfectly in the LDA.
All loads use CCI primers.
We had a great time, and I am glad that Linda is coming with me regularly now. Reloading my own ammo has made a huge difference- when we had to spring for factory ammunition it was hard to afford for us both to shoot.